Printing your cards
Printing is the final output of your work. You can print your design to any
Windows compatible printer.
Select menu File->Print, the print options window
opens up.
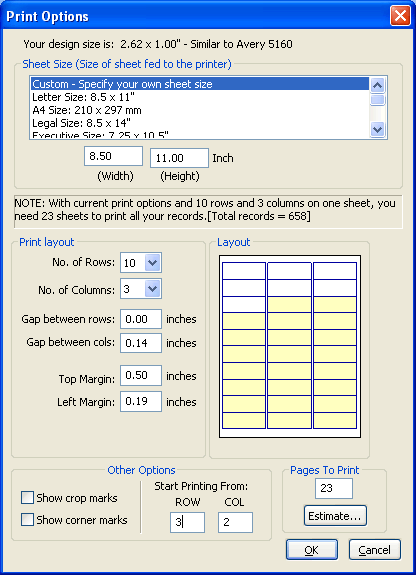
Choose your printing options-
Number of pages: Enter the number of pages to print. In case of label printing, each page will print one or many labels depending upon other options.

No. of Rows/Columns: You can print many labels on one page to maximize your page usage. Enter how many rows and columns of labels you want to print in one page. These numbers will depend on the size of your printing paper.
Gap Between rows/columns: You can choose to space out the printed of labels in one page, so that you get some room while cutting the page to separate out the individual label.
Top and Left Margin: Printer will leave these margins on top and left of the paper while printing out the design on each paper.
Start Printing from ROW/COL: This allows you to start your printing from a predefined row and column. Usage: For example you have a label sheet containing 10x3=30 labels. You have previously printed your labels on 1st and 2nd row and 1st column on the 3rd row (shown above as white boxes). Now you can use the same sheet and start printing from Row=3 and Column= 2 (as shown as yellow boxes).
Show Crop Marks: These are the marks that are printed at the top and left of the paper to show the position of each row and column to help you cut the printed paper.
Show Corner Marks: These are the marks that are printed at top-left and bottom-right corner of each print to help you cut the printed paper.
Estimate: If your printing is linked to your database, then Estimate button helps you estimate the number of pages you need to print all your labels.
For labels, you can use corner marks and/or crop marks as a guide while cutting out your labels from the printed paper.
Print Preview
Choose
File->Print Preview to preview your print layout
before printing.